Mask protocol appendix (No-Sew Mask)
This tutorial is based on a design published in the US Centre for Disease Control’s journal, Emerging Infectious Diseases. The basic design consists of one large rectangle of fabric, which is cut into straps, allowing you to tie it more securely and achieve a tighter fit. Smaller fabric squares are then added as a filter layer in front of the mouth and nose.
This design was intended to protect healthcare workers from infection, in situations where they are in close contact with infected people but have no access to proper respirator masks. It therefore uses many layers of fabric in an attempt to block fine aerosol particles from penetrating. This may make it difficult to breathe easily.
If you are wearing it to prevent yourself from infecting others with saliva droplets, for example in public situations such as transport or shops, you may not need to add so many layers. To make it more comfortable, you can use just one of the small squares.
See 'Day-to-day COVID-19 mask protocol' for more discussion of situations when this mask should be used.
Materials Needed
- Cotton T-Shirt
- The cotton T-shirt needs to be quite big (the t-shirt used in the example is 'menswear' size M)
- The stretchy nature of the t-shirt fabric helps to achieve a good fit, but you could also follow the same instructions with any piece of tightly woven cotton fabric.
- Where possible, T-shirts without text or printed designs should be used, as this will restrict breathability
- Pen to mark lines
- Ruler or measuring tape
- Scissors
No sewing is required, but if you do have a sewing machine or overlocker, it will be more durable if you overlock/hem the raw edges.
Instructions
(See below for photographs. Pictures show a mask made according to the original design, with 8 small filtration squares - for everyday activites, use only 1 square.)
- Before you begin boil the fabric for 10 minutes or machine-wash at a minimum of 60˚C to ensure that it has shrunk as much as it will. Leave to dry completely, or tumble-dry if you have one.
- Mark out a rectangle on the back of the t-shirt, as long as possible and about 37cm wide.
- A length of 72cm was possible with the T-shirt shown.
- Cut out the the rectangle, being careful to cut it only out of the back of the shirt.
- On the front of the shirt mark out and cut some small squares about 18cm by 18cm, avoiding any seams or printed detail on the shirt (if applicable).
- If you are using this mask for everyday activities, you only need one square. If you want to follow the original design for enhanced protection, cut up to 8 squares.
- If there is not enough suitable material on the front of the T-shirt, it may be possible to cut out one square from each sleeve.
- Place the square(s) in the centre of one of the long edges of the rectangle (this will be the bottom of the mask).
- If you are using multiple squares, place the squares on top of each other, 2 with the weave facing one way, the next 2 the other way, and so on.
- Mark a point about 2-2.5cm to each side of where the squares are.
- Draw 2 vertical lines between the long edges, connecting these dots.
- Draw a horizontal line on each side, 14cm down from the top, to meet the two vertical lines. Cut along these horizontal lines until you reach the vertical line.
- Draw another set of horizontal lines 8cm down from where you have just cut, again from the outside to the vertical lines. Cut along these new lines.
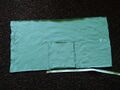
- Roll down the top of the material untill the material is over the top of the small square(s), holding them in place.
- Seperate out the 3 ties on each side
- Test fit the mask See "wearing your mask" on how it should be tied
- The bottom tie will need to be tied over the top of your head, and may not be long enough. This can be fixed by using some scraps from what is left of the T-shirt to tie an extra bit on.
- If the squares don't cover your mouth and nose, move them a bit higher.
- Lastly, cut a slit in the middle of the rolled fabric for your nose.
- What size this should be depends on the size and shape of your nose.
- Be careful to cut only the rolled fabric, not the front of the mask.
- A tight fit might be better achieved by adding some extra material in the roll where it sits between your nose and cheek.
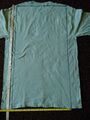
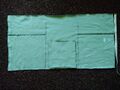
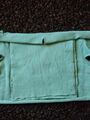
T-shirt marked out for the body of a facemask.
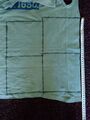
T-shirt marked for 4 filter squares.
T-shirt sleeve marked for a filter square.
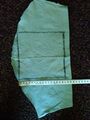
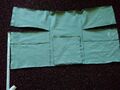
Filter squares laid on the mask body, and borders marked.
Vertical lines marked 2cm from side of filter squares, and horizontal lines marked 14cm from top of fabric.
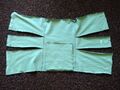
Top ties cut, and bottom ties marked 8cm below top ties.
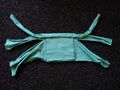
Bottom ties cut.
Top rolled down and ties seperated.
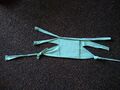
Bottom ties extended with off-cuts.
Nose slit cut in the top roll.
Wearing your Mask
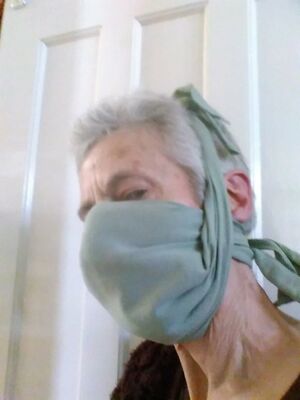
- The top, rolled up section should be lined up with the bridge of your nose, so that the small squares cover your mouth and nostrils.
- The top straps are tied at the back of your neck
- The bottom straps are tied over the top of your head, which helps to secure the lower section of the mask under your chin.
- The middle tie is then tied at the back of your neck.
- Adjust the ties as necessary to get as good a fit as possible.
Caring for your Mask
The mask must be sterilised after each use.
- This can be done by:
- Washing in a machine at a minimum temperature of 60°C, or
- Boiling for at least 10 minutes, or
- Steaming over a pan of boiling water for at least 10 minutes.
- Handle unsterilised masks by the straps only, and wash your hands very thoroughly after handling.
- Be very careful that you do not contaminate any surfaces with the unsterilised mask, and disinfect any surfaces (e.g. taps, washing machine door) which you may have touched.
- Do not use bleach to sterilise masks.
- Do not use a microwave, as this may be a fire hazard.
- The mask must be completely dry before reuse.